How to Prevent or Disable Auto Fill in Table Formulas
Bottom Line: Learn how to prevent Table formulas from filling down automatically with a quick keyboard shortcut, plus how to toggle the autofill formula settings.
Skill Level: Beginner
Download the Excel File
If you'd like a copy of the file I use in the video, you can download it here.
Preventing Autofill on Tables
When working with Excel Tables, columns will automatically fill down when you create a new formula in a column next to the table. This is called a Calculated Column.
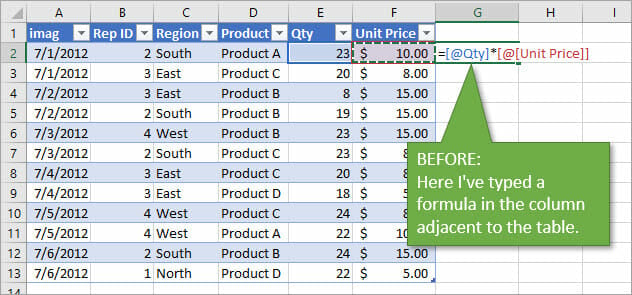
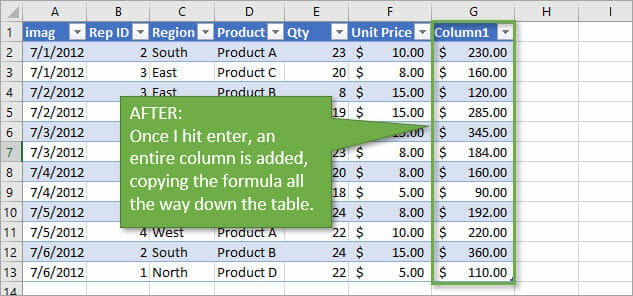
Let's look at the different ways to stop or prevent the auto fill.
What Happens When a Calculated Column is Created?
When we input a formula in or next to a Table, Excel takes a series of actions to create the calculated column.
If the formula is to the right of the Table, Excel will:
- Expand the Table with AutoExpansion.
- Fill the formula down to all the cells in the column.
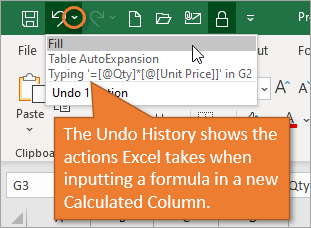
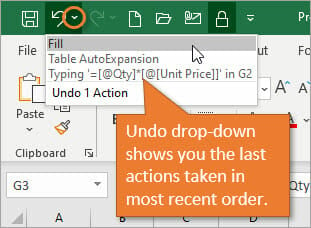
These actions can be seen in the Undo History drop-down.
Undo the Auto Fill
The easiest and fastest way to undo the autofill is by using the keyboard shortcut Ctrl + Z. This always undoes the last action taken, which in this case was the automatic filling of the columns with the same formula that was used for the original cell.
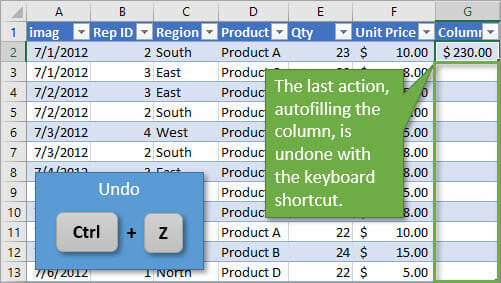
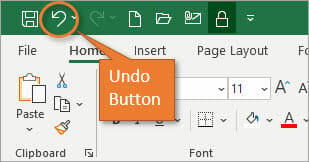
You can also use the Undo button in the Quick Access Toolbar to accomplish the same thing.
The little drop-down arrow next to the Undo button opens a menu that shows you the last few actions Excel took. In this image, you can see that the last action Excel took was to fill the cells in the column with the formula. So hitting the Undo button (or typing Ctrl + Z) once will undo that fill action.
Auto Fill Becomes Temporarily Disabled for the Column
After you undo the auto fill in the column, auto fill becomes disabled for that column. When you input another formula in the column it will NOT fill down.
However, you will see an option in the AutoCorrect Options menu to Overwrite all cells in this column with this formula. This will replace any formulas in the column with the formula you just entered. It essentially does the Fill step again.
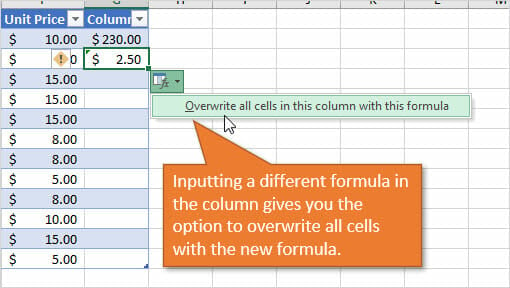
You can also bring the auto fill behavior back by clearing/deleting all cells in the column and typing a new formula.
AutoCorrection Options Menu
Another option for undoing the fill is by using the AutoCorrect Options Menu. The button appears to the right of the cell after you enter a formula in the Table column.
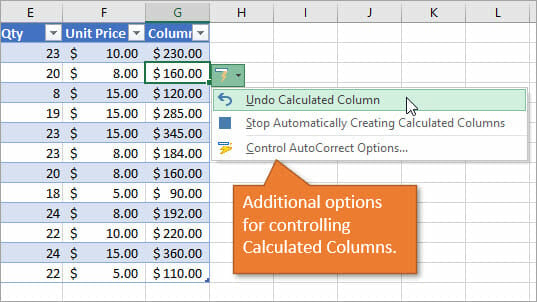
There are three options on this menu.
1. Undo Calculated Column
Undo Calculated Column accomplishes the same thing we've seen above with Ctrl+Z or Undo.
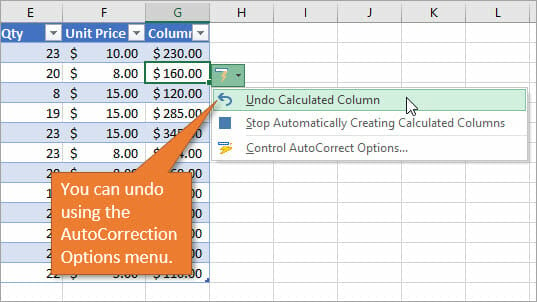
2. Stop Automatically Creating Calculated Columns
Stop Automatically Creating Calculated Columns does exactly what it says, but it's an application-level setting. That means it will stop doing this for all tables on all sheets in all files, going forward.
So you only want to choose this feature if you really don't like having columns auto fill for Excel tables.
3. Control AutoCorrect Options
Control AutoCorrect Options will open the AutoCorrect Settings window where you can turn the calculated columns (auto fill) on or off.
If you select that second Stop option (either inadvertently or on purpose) and you later want to reinstate the auto fill feature, this is how to open the AutoCorrect Settings window.
- Go to the File tab on the Ribbon.
- Choose Options.
- Choose Proofing.
- Click on the AutoCorrect Options button.
- Choose the AutoFormat As You Type tab (if not already selected).
- Check the box that says Fill formulas in tables to create calculated columns.
- Hit OK.
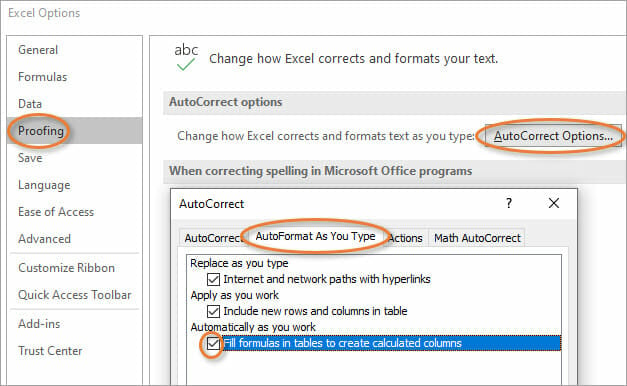
It's good to know how to get to this window because once you turn auto fill off, you won't see the AutoCorrect Options Menu anymore until you turn it back on.
It's a bit of a weird UI design for such an important and useful feature. I hope these options are added to the Table Design tab on the Ribbon in the future.
📤How to Download ebooks: https://www.evba.info/2020/02/instructions-for-downloading-documents.html?m=1


![[Free ebook] Excel Timesaving Techniques For Dummies](https://blogger.googleusercontent.com/img/b/R29vZ2xl/AVvXsEgzWyqaPosaS2VM-Nk1ab24vcKUwYTs711ThM9wp9xmavw0A3qGwRFO810Ck-OdOWZcBBky6MTqkpWRXlaZBidjaesv3AhqgLAVXQ-jUZj8erqehdQDFbSg8s0XB72D162a5fdjoeCaXCU/s72-c/2019_04_15_14.32.34_edit.jpg)
![[FREE EBOOK]101 Ready-to-Use Excel Formulas by Michael Alexander & Dick Kusleika](https://blogger.googleusercontent.com/img/b/R29vZ2xl/AVvXsEjlgcYWkmfYQbPJ8_2JubQnnsTSWEba0oUXWpGF53A6EOj30ZsVldkShWT3woS6WnNIDHMuTkRGl2Fnj8e86GA7-PRE1HEhKN6Yw_gJe00lzcxRpCXafd4IRO97ehk3PNQybVPn3k4q7r8/s72-c/101+Ready-to-Use+Excel+Formulas+by+Michael+Alexander+%2526+Dick+Kusleika.jpg)
![[Free ebook Download]Excel Formulas & Functions For Dummies by Ken Bluttman](https://blogger.googleusercontent.com/img/b/R29vZ2xl/AVvXsEhYetQg74WpM626jRfy2FNrD3T272FyEaS-6p2mBfAgithEES51mLuj76s7JDCrkb8SuwiaST1s6mox68MC6IwJYWkiFH6rRXYqnc513XGjRdYjeviLZii14QmxmThmh2D_ItCW1YTvd2k/s72-c/Excel+Formulas+%2526+Functions+For+Dummies+by+Ken+Bluttman.jpg)

![[FREE EBOOK DOWNLOAD]Excel Data Analysis For Dummies by Paul McFedries](https://blogger.googleusercontent.com/img/b/R29vZ2xl/AVvXsEgLCDTLwgLtY0xfs-YAIKyDdKhMVSIKsrnjL-GtIYwV7BD7oqVTMWc3cTR73ps7GtjNrZB5v84xN5ROGdf9_YW1oeTiV4mgMeIdfV7LZOiEBbJuY15C7Qch4jNUYd6Eb3oE_xmQUSrdfCI/s72-c/Excel+Data+Analysis+For+Dummies+by+Paul+McFedries.jpg)
![[Free ebook]Excel Dashboards and Reports for Dummies 3rd Edition - Michael Alexander](https://blogger.googleusercontent.com/img/b/R29vZ2xl/AVvXsEh9vLm6q3B9PFEAcLnQ4YrI5pH_KCv-CcunxTBBHZXcbA9rhd2RR2HchlVAguPCGRJupUJesFUkaff2DX7MCqOFwfLHU6LkePD5KMPLZB6V_9Xe64x9p_ntwaFpJMAsjYPaL1sUVMwzhuc/s72-c/2020_01_20_22.10.34_edit.jpg)
![[Free 7 PDF ebooks]Our Best Excel Cheat Sheets Part 3- 7 Cheat sheets free Download](https://blogger.googleusercontent.com/img/b/R29vZ2xl/AVvXsEgNMjh7jVGVJVBdnE0t2D2xnuAD057LL-Ew6gXJz9LfOId0bd15_tqYhUkdLEkJ8f6kALhG1wvl3klZJhhki1p2edzCel595bAS2vmvIZr60WTVu1lMvaTHED9c2X3e3gJbST-JZRM8CnQ/s72-c/2019_12_23_23.16.18_edit.jpg)
![[FREE EBOOK]Statistics for Health Care Management and Administration: Working with Excel (Public Health/Epidemiology and Biostatistics)- JOHN F. KROS and DAVID A. ROSENTHAL](https://blogger.googleusercontent.com/img/b/R29vZ2xl/AVvXsEhGsOtbdZAYn2fyIW_Z28OI89DulUpP3FPMYmpbbbIVpWcPk0ek_BLHKWYzabrk6RTO8p1wWJCJEwLVvABgvLBEIfOmGzS_L6AWZacGWTt_Ye2kzvH_NTp3Lgr_zcCddErIHKV6qJ2L050/s72-c/B06XTYZ23V.01._SCLZZZZZZZ_SX500_.jpg)
![[FREE EBOOK]Excel Formulas & Functions For Dummies, 5th Ed. By Ken Bluttman](https://blogger.googleusercontent.com/img/b/R29vZ2xl/AVvXsEjdoqrCzzIOuNJbvUH5MEY1YxOxUOFgEryEJ9qqxXoz_q8tpXdTXpqlw8byu_e9mr68In_O-gqRSMR1BsK6QZu_yNYfUqgEgU0nq3fzjHLngvxWo1xpHMG7TmzBLz3CbjwQT92f8AN2D9c/s72-c/2020_04_13_17.39.05.jpg)
No comments:
Post a Comment